Thursday, December 1, 2011

Glitter!


Helloooo! I can't believe it's been over a month since I last posted. But I have returned with my very first tutorial! Yay, aren't you excited? (It's ok if you say no, lol)

So, I'm gonna show you how to make a fairly simple stocking hanger. We don't have a fireplace so our stockings get hung on the wall.

Alright, here we go! You're going to need a small picture frame, glue or Modge Podge, tissue paper, small nails or cup hooks (or some other kind of small hook), scissors and glitter. Lots of glitter. haha. Your tissue and glitter should be similiar in color. I found these little square picture frames at Dollar Tree (love that place) You could get whatever shape you want but this is the look I was going for. First, you want to remove the little board on the back that holds the picture in and the glass, set those aside.


 Now cover the whole surface with a layer of glue or Modge Podge. Modge Podge is awesomeness in a jar but white glue is cheap. Take your pick. Make sure you that little edge on the inside and the sides.


Cut a piece of tissue paper about an inch larger than your frame all around. Cover the frame and smooth it out. Make sure you get it down good on the sides. It doesn't have to perfect, we're just trying to create a matching base for the glitter. On that note I should mention that you could skip the tissue altogether and just paint the frame with acrylic paint.


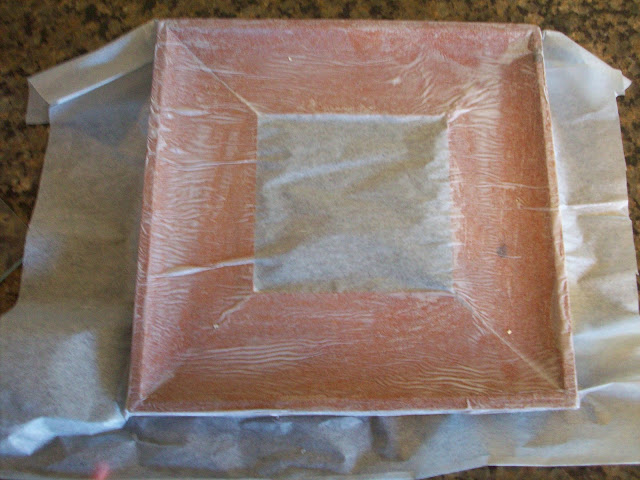
 Now cut an X across the frame opening. Push those little triangles down and around to the back so they stick to that inside edge. This is where I realized that my tissue paper was way too thin (probably got that from Dollar Tree too lol) so I added another layer. Let this dry.


Now trim all the excess paper and cover with a thick layer of glue.
(Check out the woman in the corner down there...Doesn't she look comfy? hahaha)


Aaannndddd....GLITTER! Shake that glitter all over. Be generous, you can pour what doesn't stick back in the jar. Let dry and shake off the extra. Be sure to let it dry first!

Add your hook or nail to the bottom, hot glue some ribbon to the back and add something lovely to the opening! Here's mine:


 And a close up- it's a square of wrapping paper, a square of cardstock cut with decorative scissor, and little scrapbooking letter (a nice little set from Target's $1 section) covered in more glitter. Can you tell I like glitter? However, I detest the word "bling", but the a whole other post.

And here's my whole set up. Hanging on the wall over the couch. Loves this.
You might note that although I had the foresight to buy an extra frame for Little Fat  (who was yet to be born last Christmas) I did not have the foresight to buy an extra stocking. Doh.
I'm sure that Pinterest can supply me with oodles of fantabulous ideas. Heck, we might all get new stockings.


And there you have it! A nice little stocking holder for all the mantleless people of the world.

Thursday, October 27, 2011

I'm still here!

Hellooo there! Yes, it has been a while. Apparently regular blogging is a wee bit difficult when you have small children to tend to. Not to mention one who has decided that in addition to his 4 am bottle he also needs one at midnight, therefore disturbing mommy and daddy's sleep, but I digress. Here's what I've been working on:

A set of coasters for someone in my women's group

 Fleece baby booties for Little Fat (as we so lovingly call my youngest son Ean) We have issues with keeping socks on him so I searched for a simple bootie pattern with elastic. Hopefully these will stay on and keep his cute little fat feet nice and toasty. Tutorial found here and multisized pattern found here. I will mention that I made mine from the pattern at the first link and they look a little small. (It's nap time so I haven't tried them on yet.) However, at his first doctor's visit the doctor walked in, started messing with his legs and said, "Wow, he has big feet." Hahaha. So they may fit your baby just fine.
I'm also thinking of making some Elmo ones in the medium size to give to Evan for Christmas.
 (By the way, you'll probably be seeing a lot of my kitchen floors because that's where the best light is lol. Just ignore any crumbs and whatnot that try to sneak in. Anybody wanna buy me a steam mop? I hear the Shark is good!)


And last but not least, a simple little bag for Evan's Halloween goodies. FYI, freezer paper stenciling is major awesomeness but don't try it on really cheap thin fabric. Ask me how I know. There's a funky lookin' little pumpkin painted under this one.

Wednesday, October 12, 2011

Extreme Couponing

Do you use coupons? If you don't you really should. It takes minimal effort really and can save you lots of money! I am by no means an extreme couponer. I don't have a coupon binder or stockpile and I don't dumpster dive for coupons. I'm an amateur really but check out what I bought today:


I got all this at Homeland for $34 and some change: 24 yogurt cups, 4 jars of pasta sauce, 4 frozen meals, 1 tub of mashed potatoes, 1 tub of Philly cooking cream, 4 bottles of citrus tea, 1 large bottle of sweet tea, 2 cream of chicken soups, 3 cream of mushroom soups, 5 chicken noodle soups, and 3 cans of chunky soup. I also earned a ticket (maybe 2) to An Affair of the Heart


(If this doesn't seem like much to you for $34 just know that at WalMart's regular prices the yogurt alone would have cost $16)


I use these two sites to find the majority of what I'm going to buy:


www.simplesavingsavvy.net and www.consumerqueen.com


Thursday, October 6, 2011

What's for dinner?

I came across this delicious looking recipe on Pinterest not too long ago...


...and tonight I tried it out. Let me tell you, it tastes even better than it looks. Everybody (including the baby) loved it!


For the filling I used:

about half of a rotisserie chicken from the deli at WalMart
4 ounces cream cheese
8 ounces ricotta cheese
3 tablespoons basil pesto
1/4 cup jarred alfredo sauce
a couple tablespoon of grated parmesan cheese

I switched up the recipe a little because I knew I liked ricotta filling but wasn't sure about the cream cheese and I wanted to save the rest of the cream cheese to make some of these:


The link goes to a recipe for french toast but I just make the sauce and frosting and put it on homemade buttermilk pancakes. Mmm....

Make your own laundry detergent!

Last week I made my own laundry deteregent using the recipe and instructions from here:

http://www.diynatural.com/simple-easy-fast-effective-jabs-homemade-laundry-detergent/

Grating the soap is kind of tedious but the rest of the process is easy peasy! After I made mine I read a comment somewhere that you can put the bar of soap in the microwave for two minutes and it will puff up then you'll be able to smush it into a fine powder, so I'll try that on my next batch. But considering that you only use 1 tablespoon per load, that might be a while! The only downside is that your clothes don't smell like lavander/lemons/etc afterwards. However, if you like your clothes to smell like, well, clothes then this is right up your alley! It makes almost no bubbles in the machine, but your clothes will definitely be clean!

If you're interested in making your own laundry detergent check out Google or Pinterest for lots of variations.

Wednesday, September 28, 2011

Are you smarter than a 2 year old?

For the record, I currently am. Getting my 2 year old son to stay in his room at night and actually sleep has been a bit of an uphill battle. It all started when we got the toddler bed of course. First, we thought we'd try just using a baby gate. Fail. He kept opening the door to peek over the gate. His little face peeking out was pretty cute for about .05 seconds. Next, we decided to just lock the door. Well, then he kept turning the light on, and a week ago his smarty pants friend (who is also 2) taught him how to unlock the door. So, FINALLY our solution was to flip the door handle around and install this:


25 cents worth of wood trim from Home Depot and some hot glue to cover the light switch. I was going to paint it white to match but then I didn't feel like it. :) Unfortunately, this doesn't stop him from waking up at the crack of dawn yelling for me to let him out. Oh well, guess I can't have it all.

Friday, September 23, 2011

Finally!

I've been debating the idea of a blog for some time now. I set up my blogger account, made up a catchy title, and set to work designing my blog. Well...that's where the fun ended. I just couldn't get things to do what I wanted them to. Of course I know there are tons of tutorials out there to help me figure out how to make my blog look exactly the way I want it to but I don't have the time (or the interest really) to read them. I said all that to say....I gave up on my lofty goals of perfection and left it at this! Which is still pretty cute in my opinion. :) So join my on my journey of "Doin' the Dunlap" as I cook, craft, sew, raise 2 crazy little boys, blabber, and try to live like Jesus. (That last one is a doozy!)